Category Archives: DIY

Proper Pineapple Project Bag Unboxing

One of my favorite hobbies is crocheting.  I just started about a year and a half ago and learned a lot from watching YouTube Channels.  I found the Proper Pineapple pretty early on and just love watching Holly and her family.  She just always seems like she’s having the best time!

Recently, I ordered a Halloween project bag from her website.  The package was so cute that I decided to test the video feature on my new camera by doing an unboxing.  Here it is:

2017 Garden Moments

A week ago, it was in the 70s then Fall finally arrived for a few days. Yesterday, it seemed like Winter came early.  Brrrrrr!!!!

Here are some shots from my 2017 Garden to warm things up (Click on the photo to view a larger image.):

Tiny seedlings

Tiny seedlings turn into Great Starts


Waste not! Eat those thinned out seedlings.


Miles the Compost Pile is born!


The Care and Feeding of Miles…


Everything in my little pocket farm was grown from seed.


Gotta have some ornamentals too!


Tillandsia (air plant) Garden


Back to the tomatoes: Baby Beefsteaks, Baby!


Zuke and Cuke Blossoms


Baby Zuke!


Reaping and eating the harvest!

Zoodles! (Zuke Noodles)


Baby Cukes!


Home for the Bees ?


Sunflowers


Thanks for viewing.  I hope you enjoyed my little garden tour.

Many blessings,

Cynthia

Meet Miles The Compost Pile!

I have been feeling a little guilty ever since I put up this post, Naturally Resourceful: Getting Scrappy with Vegetables! I mentioned in that post that I was too time-crunched to have a compost heap even though it would be great for my plants and the environment.

Nothing has changed schedule-wise for me since then.  However, my passion for gardening is now completely unhinged.  (It gets me through the day, people!)   I found I was spending an enormous amount of money on compost which is so riduculous considering I was, guiltily, throwing away things all the time that can be composted.  So, I decided to save money, myself from guilt and, hopefully a little of the environment by starting a compost bin.

I decided to use this garbage pail because it has a lid and I want to keep creatures out of my bin.  I burned holes in the sides:

And the lid:

With a hot glue gun.  I do not endorse this method because melting plastic never seems like a great idea.  However, my cordless drill wasn’t charged (as usual) and I really wanted to get it done.  I waited until I could no longer smell melted plastic and then gave the can a good swabbing before I started to add compost ingredients.

There are so many good resources for what to put in compost and even more importantly, what not to, like Jeff Yeager’s Rotten Luv, I am not going to go into too much detail.  Basically, you want a 2:1 ratio of brown matter to green matter.  I used newspaper shreds for brown matter.  (I figured The NY Times was appropriate for a compost heap named Miles) and for the green matter, I put in coffee grounds, eggshells (No, I didn’t eat the eggs!), plant stems, veggie and fruit peels.

Yum!

I layered the ingredients and gave it a stir.  And that’s it.  I’ll keep adding the ingredients in that 2:1 ratio, and keep stirring it up.  Mostly,  I can just let nature turn it into Black Gold for me.  There are more significant holes in the bottom of the can.  I placed it directly on dirt in the hopes that some worms will find their way in and take up residence, further enriching Miles with their castings.

Why did I name my compost heap?  Jeff Yeager named his Gomer.  I thought it was funny.  So, I decided mine needed to be named too.  So, Miles the Pile was born yesterday May 27, 2017.  I am looking forward to seeing him and my garden grow!

Many blessings,

Cynthia

Seeds Update

There is some good news and not so good news.

Bad news first,  the indoor herb seedlings didn’t make it.  I suspect I didn’t get the peat pots wet enough to start and the sides needed to be covered better with the plastic.  I’ll direct sow them again outside.  I think they will be fine.  I’ll just need to wait a little longer to harvest them.

Now for the good news!  The tomato plants are doing great.  So great in fact, I needed to find homes for them.  Several people have said they will be happy to adopt the little leafy guys once they are hardened off and can live outside.  They should be ready in about two weeks.

So, tell me how is your garden growing?

Many  blessings,

Cynthia

New Dragon Egg

Just a quick post for fun and to remind you to explore your creative interests.  It’s easy to neglect your hobbies this time of year.  If you are a creative person though, you may start to feel cranky and out of sorts.  Sneak in a little time for yourself.

Newest Dragon Egg

I finally finished this Dragon Egg.  I started working on it in August!!!  I am pretty happy with the way it turned out.  The color changes significantly depending on the light.

Dragon Egg on HandIt looks much bluer here.  It’s sort of a silvery periwinkle with pinky-rose glittery accents.  Much girlier than my last dragon egg.

Two Dragon Eggs

Two Dragon Eggs

Here it is, side by side with the first one I made.  I have to make a stand for it.

Many blessings,

Cynthia

Please follow me on Twitter. Also, please LIKE my Facebook Page.

justdragonfly

Save

Save

Save

Save

Easiest DIY to to Upcycle Corks Ever!

The easiest way to reuse a cork is to stick it back in the bottle.  So, technically this would be the second easiest.  You might be able to do it right now.

I was organizing my essential oils when I spotted an accumulated collection of wine corks.  Am I the only who has trouble throwing them away?  If you do too, you might want to try this.  It occurred to me that if I put some cedar wood oil in the cork; I could throw it in my closet and it would work like those little cedar balls that you can buy at the drugstore.  So, I did and it does.

Just put a few drops right in the hole where the corkscrew went.  You can put it anywhere you want really since the cork is porous.  However, it’s a lot less messy if you put it inside.  It occurred to me that I could use whatever scent I wanted.  So, I started adding a few drops of lavender oil as well.  My closet now smells lovely!

There you have it: easiest cork DIY ever.  You’re welcome!  Tell your friends!

Many blessings,

Cynthia

Please follow me on Twitter.  Also, please LIKE my Facebook Page.

justdragonfly

Naturally Crafty: DIY Father’s Day Card

Did you know that greeting cards were handmade up until the middle of the nineteenth century?  That was when advances in printing made it possible to reproduce a design relatively cheaply.

I can’t help but think sometimes that technology and the ability to mass-produce cheaply has turned many of us into mass consumers rather than creators.  Well, I say “NO” this year to a cheap, mass-produced Father’s Day card and “hello” to creating my own handmade greeting.  I also decided to make it mostly from materials destined for the bin.

When we get book inserts at work, they come wrapped in shrink wrap on these cardboard pieces to keep them from getting damaged in shipping.  Since my office building doesn’t recycle, I have been trying to find ways to reuse them.  Usually, I stick them in large envelopes to keep documents from getting bent in the mail but I have found they are also great for craft projects like making cards and journals.

Father's Day Card Materials smaller

All of the materials used in this card, except for the gold ribbon, the lettering, the white inner paper, the gold washi tape and the Velcro dot on the inner envelope, were saved from getting dumped in the bin at work.  (If you need orange envelopes…call me.)

Father's Day Card Front

The white heart was punched from a name tent from a past class.  The circle behind it is punched from a Thank you card someone was kind enough to give me.

Father's Day Card Inside

While it may not be perfect in the way that a commercial card is, making your own gives you an excellent opportunity to add fun embellishments or personalize your greeting to the recipient.

Lucy Envelope

I added this envelope in the back, so I could include a letter from my parents’ dog, Lucy.  (They receive correspondence from Lucy whenever they go on long trips.  Perhaps, not surprisingly, this began when I found myself with an over-abundance of orange paper and envelopes.)

Tell me, do you ever make your own cards?  Is it something you would consider?

Wishing all you fathers (of humans and furry kids) a very happy Father’s Day!

Many Blessings,

Cynthia

Please follow me on Twitter.  Also, please LIKE my Facebook Page.

justdragonfly

Save

Save

Save

Save

Save

Save

Save

Save

Save

Repair or Replace: Are You a Lamp-Saver?

What do you do when something breaks in your home? Fix it, forget it or replace it?

Recently, I was in my parents’ garage when I spied their bedside table lamp languishing in a corner. I remembered about a year or so ago that it stopped working. My father said he would fix it. Somehow, it migrated from the bedroom to the basement and eventually ended up in the garage a.k.a. “The land of forgotten best intentions.”

I picked up the glass shaded touch lamp and wondered how it would fair out in the outdoor storage area for long. Other than a coat of dust and a slightly bent finial, it seemed fine. It seemed too nice to eke out the rest of its existence, forgotten in the garage. I remembered Mom saying she liked it better than the replacement they picked up. I had no idea what was wrong with it or how to fix it but I seem to have a knack for figuring things out (My superhero name would probably be The Researcher. Sexy, no?)

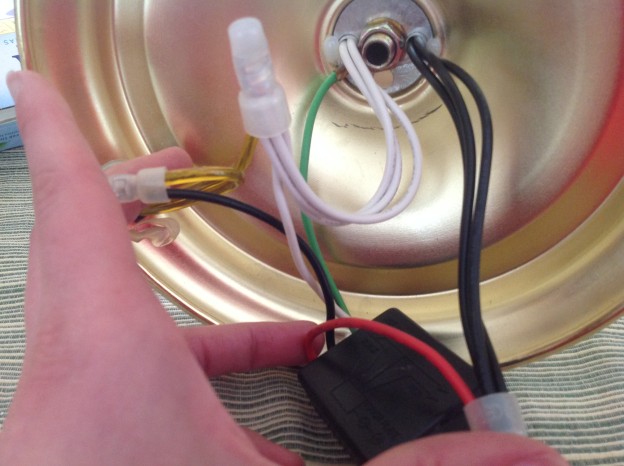
A few quick google searches revealed that the little lamp was probably ailing from a dimmer switch that went bad. Apparently power surges are the main nemesis of touch lamps. The part was about $8 at Home Depot. (I wonder how much the new lamp was.) I picked it up and attempted to install it myself but was thwarted by the plastic caps on the end of the wires. Little suckers wouldn’t come off! So, I turned the project over to Dad and within an hour he restored it to working order.

The whole thing got me thinking about how people seem to have stopped repairing things like that. It’s just so easy to go out and pick up a new one, relatively cheaply. I wonder how many of us really even think twice about fixing anything that originally cost under a $100. We then start accumulating all of these broken items in garages, sheds and basements because we feel guilty, knowing they can be fixed and should be, but it just doesn’t happen. Eventually, we run out of room and these items either get moved to a storage facility or thrown out. If they get thrown out, they sit in landfills, taking many, many years to decompose or are incinerated, releasing toxins into the environment.

We don’t like to think about our waste or what it is doing to the planet. I get it. I am busy too. Sometimes, it seems like if I have to stop and consider the implications of everything I throw away, my head might explode. I forgot to bring a fork to work with my lunch the other day and ended up using a plastic one. It happens. I wasn’t about to eat chili mac with my hands. However… maybe when something like a lamp or something similar breaks, knowing it’s not a big, expensive repair, it’s worth considering the time and effort to save it. When you do, you are saving money, space, the environment and possibly giving a repairman much needed work if the job is outside your abilities. That’s a pretty great return on investment!

Are you a Lamp-Saver? I would love to hear about your home repair triumphs. Please share them in the comments section.

Many Blessings,

Cynthia

Please follow me on Twitter.  Also, please LIKE my Facebook Page.

justdragonfly


Naturally Creative: The Perfect Gift

I love it when I get to make gifts for people.  I really try not to be annoying about it.  I mean I don’t make things to get out of buying things.  It is nice to save money when you are on a budget but I genuinely enjoy being creative.  So, when the stars line up affording me the time, opportunity and inspiration to make something I believe someone else will appreciate, truly, I am at my happiest.

Up until recently, I never had the chance to make anything for my dad.  Dad is a manly sort of guy!  I make jewelry, bath and body products, etc. While he enjoys my baked goods, I have never have been able to make him anything that lasts.  So, imagine my delight when I happened across this dragon egg tutorial from Accio Lacqueur!  So happy!

Just to give you a little background.  Dad is a very well-read cat, everything from classics to military history, sci-fi, thrillers, you name it BUT fantasy is one of his faves.  So, Dad is a big Game of Thrones fan.  In fact, Dad, my brother, sister and I, all started out reading the George RR Martin Series but I bowed out after two or three books.  (I need more dragons and magic, less gore; more romance, less creepy sex.  I digress…)  Dad has been an avid fan of the show since the beginning. When he took me to the Renaissance Festival last September, it seemed like every time we turned a corner, he was greeted with “Game of thrones!” or “Winter is Coming!” because he was sporting the coolest Family Stark tee shirt in all the realm.

We both like dragons.  Here are two of Dad’s snaps from that day:

Bigger DragonLittle Dragon


Pretty cool huh?

So, after after putting 5000+ tiny coats of varnish on 1000+ tacks over countless netflix sessions, this

image


Turned into:

Dragon Egg Two

So much fun!  I just had to share.

Do you ever make gifts for people?  Leave me a reply in the comments section.  I would love to hear all about them.

Many blessings,

Cynthia

Please follow me on Twitter.  Also, please LIKE my Facebook Page.

justdragonfly