Category Archives: Recipes

Quick (Mostly Healthy) Tea Cookie

I was perusing YouTube the other day when I came across a quick and easy tea cookie recipe from Mary Harris on her Sprout and Blossom channel.  I thought, “Ooooo, tea cookie!  That sounds lovely and comforting.  I have to try that this weekend,” So, I did.

Two main ingredients: banana and oats, what could be simpler?  Mary’s recipe is quite healthy, as well as quick and easy, but I wanted to do the cocoa, peppermint variation.  I was concerned that the cocoa might be a little bitter with only a banana as sweetener.  So, I added a little sugar.

Here’s my variation on the Sprout and Blossom Three Ingredient Recipe:

One cup rolled oats (blended into a flour consistency)

Two small to regular mashed bananas

One teaspoon vanilla extract

One level tablespoon of cocoa powder

Two tablespoons of organic cane sugar

About 3 drops of peppermint extract

About a quarter cup of mini chocolate chips

Preheat oven to 350 degrees.  Mix everything together but add the chips last.  Drop teaspoons of the batter on a lined baking sheet.  Bake for approximately 20 minutes.  (Keep an eye and nose on them, as baking times tend to vary depending on your oven.). I got a dozen cookies out of this mix.

Enjoy!

Many blessings,

Cynthia

Please follow me on Twitter. Also, please LIKE my Facebook Page.

justdragonfly

Want to Save Money, Lose weight and Be Healthier? Eat Cabbage!

Until recently, whenever I thought about cabbage I would remember the unwelcome smell that permeated the hallway of my grandmother’s building in Far Rockaway, NY. It would make my nose wrinkle and I couldn’t wait to get into her apartment which always seemed to smell like fresh baked dinner rolls or something equally delicious.

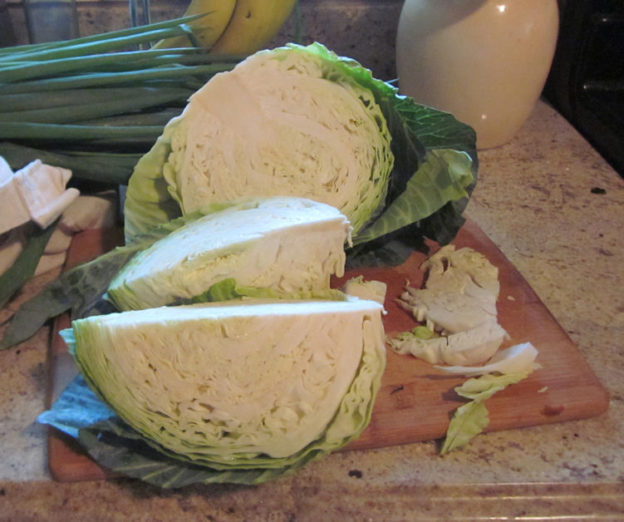
So, I quite surprised myself when I picked up a head of cabbage at the farmer’s market.  I did it for two reasons: 1. I know how nutritious it is.  2.  It was only $2.  WIN, WIN!

I pondered what to do with it on the way home.  Then I surprised myself again by slapping the steering wheel and declaring out loud, “I am going to make sauerkraut!”  I have no idea where the thought came from since I never made it before and quite frankly… I never even really thought about sauerkraut being comprised of cabbage.  The same goes for coleslaw (which I also decided to make.)

How hard could it be?  It turns out, not hard at all.  It became clear after some quick research that sauerkraut is merely cabbage+salt+time.  I chopped the cabbage as thin as I could by hand, threw in a few tablespoons of kosher salt and began to massage it.  I found myself wondering how many of my German ancestors must have done the very thing I was doing at that moment.  It felt so natural working the salt into the cabbage until the juices flowed out.  After about 10 minutes, I decided I created enough of a brine to jar it up.  You want there to be enough liquid to fully submerge the kraut.  I used an onion* half to weigh it down in the jar.  After that, I topped the jar with a coffee filter and rubber band.  I found this set-up very effective for keeping the oxygen out while allowing the carbon dioxide to escape.  Then I set the jar in a dark cabinet in the basement, the only place that might come close to maintaining the ideal temperature range of 65 to 75 degrees.

How does this make sauerkraut?  The short answer is that cabbage naturally carries bacteria like lactobacilli which helps kick off lactic acid fermentation.  The salt preserves the cabbage to keep it from rotting while fermentation takes place.  There is a lot of debate about the proper amount of time to allow sauerkraut to ferment, anywhere from three days to six months.  I found the most consensus that around three weeks is enough time.  The idea is to allow the sauerkraut to ferment long enough to produce a goodly amount of probiotic bacteria. Then after that it’s just about taste.

However, if you are like me and you can’t wait that long or if the average temp is above 75 degrees then two weeks is long enough.  Also, keep in mind, the sauerkraut will continue to ferment in the fridge.  It will just happen much more slowly below 65 degrees.

BBQ beans on toast with tomato, olives, homemade kraut and a pickle... what more could you ask for?

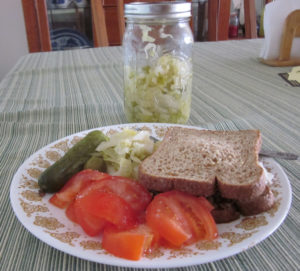
BBQ beans on toast with tomato, olives, homemade kraut and a pickle… what more could you ask for?

I have to tell you that homemade sauerkraut is DELICIOUS!  It is so much better than store-bought. I am not sure I could eat the canned stuff ever again.  Give it a try if you like sauerkraut.  You have nothing to lose.  I paid two dollars for a head of cabbage at the farmer’s market.  (I noticed they are $1.29 at the supermarket.)  That one head netted me 16 ounces of sauerkraut and eight cups of coleslaw.  I call that VERY budget-friendly!

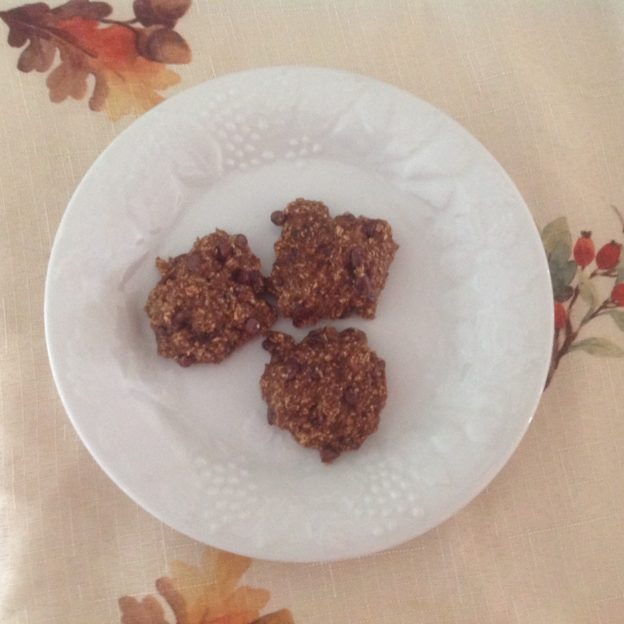
I will get more into the nutritional and weight loss benefits of cabbage in my next post, as well as share the coleslaw recipe I concocted.

Many Blessings,

Cynthia

*I got the onion as a weight idea from the Dr Axe website: https://draxe.com/recipe/sauerkraut-recipe/

Please follow me on Twitter.  Also, please LIKE my Facebook Page.

justdragonfly

Homemade Tahini and My New Favorite Sandwich

I use A LOT of tahini.  I need it for hummus, salad dressing, sauces and as a spread for my new favorite sandwich (that I came up with during a moment of divine inspiration.  Recipe below.)  The problem is, tahini is expensive!  The supermarket brand, which I don’t love, is $7 a can.  Once Again, my favorite brand, is $10 a jar.  Yikes!

Clearly, I needed to learn how to make my own.  The good news is that is EASY, delish and SO MUCH CHEAPER.  I found a recipe on Kimberly Killegrew’s  The Daring Gourmet website.  All you need are sesame seeds, a little oil and a food processor or blender.  I ordered a five pound bag of hulled sesame seeds… (as I mentioned I use A LOT of tahini.)  You toast the seeds until they are golden brown; let ’em cool, toss ’em in the food processor with a little olive oil and that’s it!  One thing I did do differently than Kimberly was toast the sesame seeds on a parchment-lined cookie sheet in the oven, rather than in a skillet on the stove top.

Now for the sandwich!  I invented this recipe while I was rushing around making lunch one morning,  When you are a strict vegetarian and short on time, you need to get a little creative when it comes to lunch sometimes.  You will need two slices of bread. I prefer rye.  Spread the tahini on both slices.  Drizzle Sriracha sauce over the tahini.  Drizzle honey over the sriracha sauce.  Add a slice of beautiful tomato (preferably from the Farmer’s Market or at least organic.) Enjoy with or without a pickle.  It is so good!  It’s sweet and hot with the yummy nuttiness from the sesame seeds.  Oh my goodness!

Cynthia's Favorite Sandwich

Cynthia’s Favorite Sandwich


Do you make your own tahini?  Would you try it now that you know how easy and cheap it is?  Leave me a reply.  I would love to hear from you.

Many blessings,

Cynthia

Please follow me on Twitter.  Also, please LIKE my Facebook Page.

justdragonfly

Naturally Nutritious: Beet Greens and a Smoothie Recipe

One of the nicest things about shopping at the farmer’s market is that you see the produce in its natural state. There is no way you could transport beets and other root vegetables with the greens still intact. They would rot over the thousands of miles it takes for them to be delivered. Heaven forbid should there still be any soil on a fruit or veggie in the supermarket! By the time we see them, they are the de-stemmed, triple-washed, gleaming, little, over-sanitized specimens, we expect them to be. You’d never guess that they had been grown in dirt.

Unfortunately, we miss out on the greens. Beet greens, like all greens, are high in fiber. They also contain significant amounts of vitamins K, C and A. Best of all, they are tasty! Some people find them bitter. I honestly don’t. Compared to kale, they are almost sweet… but not quite. I would say they have a fresh, green, earthy flavor. Beet greens are excellent sautéed. They can be added to soups and stews or served raw in salad. I enjoy adding beet greens to my autumn smoothies.

image

Autumn Apple and Beet Green Smoothie

One Cup of Almond Milk

One Apple (cored and cut in a few pieces)

Handful of Beet Greens

Handful of Kale

One Banana

A few drops of lemon juice

Two Tablespoons of Chia Seeds

Throw all the ingredients in a blender. Blend until smooth. Drink immediately. (I have begun to add the chia seeds after I pour it into a glass. Little suckers get stuck to the side of the blender if you aren’t careful!)

Do you eat the greens that come with your root vegetables? Would you? Please leave me a reply. I would love to hear from you.

Many Blessings,

Cynthia

Please follow me on Twitter.  Also, please LIKE my Facebook Page.

justdragonfly

Natural Beverage: Cherry Vanilla Soda

I drink A LOT of water, especially at work. Sometimes, I want something a little more interesting. We all need a little sparkle, a little effervescence from time to time. I don’t drink soda anymore but I do drink seltzer.

I started adding Tart Cherry Juice Concentrate to my seltzer last year. I have trouble sleeping. Tart Cherry Juice is a natural sleep aid. So, it’s a good way to up the healthy in my beverage. However, it is tart! So, I came up with following recipe to smooth out and sweeten the flavor a little bit.

Healthier Cherry Vanilla Soda

A tall glass

Three Tablespoons of Tart Cherry Juice Concentrate

One teaspoon of vanilla extract

Quarter teaspoon of stevia

Ice Optional

Fill glass Three quarters of the way with seltzer. Add the rest of the ingredients. Stir. Add ice. Enjoy!

Do you have healthy beverages that you like to drink? Please tell me about them in the comments section. Leave me a reply. I would love to hear from you!

Many blessings,


Cynthia

Please follow me on Twitter.  Also, please LIKE my Facebook Page.

justdragonfly

Naturally Homemade: Make Your Own Bread

There was no bread in the house this morning. I was going to run out and pick some up but then I remembered, I can make my own. I am off from work and had stuff to do at home; so, why not?

I started making my own bread last winter. I used to be intimidated by using yeast. I heard horror stories from people about how their breads and pastries never rose. Then I found this really easy recipe on holycowvegan.net and decided to give it a go:

Fast Whole-Wheat Bread

Author: Holy Cow! Vegan Recipes

Ingredients

  • 1 cup whole-wheat flour
  • 2 cups bread flour
  • 2¼ tsp (1 package) active dry yeast
  • 1 tbsp sugar
  • 1 tsp salt
  • 1 cup warm water (not hot– you will kill the yeast)
  • 2 tbsp extra virgin olive oil

Instructions

  1. Place 1 cup of the bread flour, the whole-wheat flour, yeast, sugar and salt in a large bowl or in the bowl of a stand mixer. Whisk to mix together.
  2. Add the water and the olive oil and mix. Add more of the bread flour if needed. How much flour you will need, will depend on where you live and what the weather’s like. I made this bread on a rainy day in Washington and I needed nearly the whole cup. If you live in a dryer region you might need less.
  3. Knead the dough for 10 minutes by hand or with your dough hook set to low speed.  You should now have a smooth, pliable ball of dough that’s not at all sticky.
  4. Place the dough ball in an oiled bowl, turning over once to coat the top with oil.
  5. Cover loosely with plastic wrap or a kitchen towel and set aside for 30-45 minutes or until the dough has doubled in size.
  6. Remove the risen dough from the bowl and punch it well to deflate all the gases. Using a rolling pin, roll out the dough into a triangle about 10 inches long. Now roll the dough toward yourself and make a cylinder, tucking down the seams and pinching them in so you have a smooth loaf.
  7. Place the dough in a standard loaf pan, seam side down (most loaf pans are 9 X 4½ or 10 X 5 inches)
  8. Cover loosely with oiled plastic wrap and let the bread rise in a warm place about 30-45 minutes or until the loaf has risen and domed over the top of the pan.
  9. Preheat the oven to 450 degrees Fahrenheit.
  10. Place the loaf in the oven and bake for 10 minutes. Then lower the heat to 350 degrees and bake another 30 minutes.
  11. Remove the loaf pan to a rack and let it stand until the bread is cool enough to handle. Remove the bread from the pan by loosening the sides with your fingers or a spatula. Place on a rack until it has cooled through.
  12. Slice. Eat.

I have been making it for quite a while and have since made some of my own alterations. Instead of adding more bread flour during the mixing stage, I add the whole wheat flour. So, usually I do 2 cups of whole wheat flour and one cup bread flour. I pre-heat the oven to 425 degrees but I turn it down to 350 right before I put the bread in. The crust is slightly softer that way and better for making sandwiches in my opinion.

Making your own bread is fabulous when you have the time. The benefits are numerous. You can control the ingredients. There are no preservatives. It’s always fresh and delicious. I really love the self-sufficiency of making my own bread.  I am being creative, rather than just consuming. I am not reliant on a store to provide for me.  By far though, my favorite part is the smell! Oh my goodness, your house will smell so so so wonderful. Your nose will be very happy!

Do you ever make your own bread? Are you willing to give it a try? Please leave me a reply in the comments section. I would love to hear from you.

Many blessings,

Cynthia

Please follow me on Twitter.  Also, please LIKE my Facebook Page.

justdragonfly

Naturally Dairy-free: Vegan Parm “Cheese” Recipe

I mentioned in my Naturally Healthy Fat-free Snack: Baked Kale Chips post that I make a vegan Parmesan to sprinkle on my chips.     A few of you expressed interest in the recipe.  So, here it is:

Vegan Parmesan

One Cup of Cashews

One Tablespoon Dried Dill

One Teaspoon of Salt.

Throw everything in the Vitamix or high-powered blender. Grind it down until it resembles Parmesan.  Store in an air tight container for up to a week.

You may want to use less dill.  I love dill and put it on everything.  To me, it’s like the little black dress of herbs.  I can’t get enough of the stuff.  There are a lot of recipes for  vegan parm that use nutritional yeast.  That would be the way to go if you don’t like dill (which is practically impossible for me to imagine) or you don’t want green flecks in your parm.

Many blessings,

Cynthia

Please follow me on Twitter.  Also, please LIKE my Facebook Page.

justdragonfly

Naturally Better: Make Your Own Vanilla Extract

I bake A LOT, just about every weekend. So, I go through a lot of vanilla extract. I kept buying those cute little two ounce bottles of it every month or so. It was really quite expensive. I wondered if I could make my own cheaper and better.

Vanilla extract, real vanilla extract, is just vanilla beans extracted into alcohol. That’s it! Vanilla beans + alcohol + time= vanilla extract. So easy! The neat part is you can vary the taste depending on what alcohol you use. I use bourbon. I think it gives it a really rich warm flavor. You could use rum for a more exotic flavor. Use vodka if you want a more exact, straight vanilla flavor. Use brandy for a … if you like brandy…

The other great part is you can make a HUGE amount of it with a relatively small investment. Currently, I have a 750 ml bottle steeping. I spent less than $35 on the bourbon and vanilla beans. That’s going to make over 25 ounces of vanilla extract or the equivalent of 12 and a half of those little bottles! That has to be savings of well over $25.

A word on vanilla beans: they should be soft, bendable and very fragrant. If they are hard and dry, you probably are not going to get much out of them.

Fresh vanilla beans bend

Fresh vanilla beans bend

The first time you try it, I would suggest starting with a half-pint of liquor. There is some debate over how many vanilla beans you need but really it depends on your own taste. I think a really easy place to start is half a bean per ounce. So, that is four beans for a half-pint. (Make it five if you want it extra vanilla-ey!)

Split the vanilla beans length-wise.

Split beans length-wise.  All the little seeds will be revealed.

Split beans length-wise. All the little seeds will be revealed.

Put them in the bottle.

Beans in bottle

Shake the bottle.

Wait for at least a month before using. Two is better. Give the bottle a shake every once in a while.

Once the extraction process is complete, then you can strain out the beans if you like. I just leave them in there and let them keep steeping.

It’s a good idea to re-label your bottle, lest it end up on your bar cart.  (Although, that would probably make for some delish cocktails!)  Also, you can put the date that you created it on or the date it’ll be ready.  By the way, vanilla extract never expires.

Relabeled

Relabeled

Do you make your own vanilla extract already? Would you give DIY vanilla extract a try?  Leave me a reply and let me know.

Many blessings to all,

Cynthia

Please follow me on Twitter.  Also, please LIKE my Facebook Page.

justdragonfly

Naturally Healthy Fat-free Snack: Baked Kale Chips

I always liked the idea of kale chips but whenever I tried the store-bought kind, I found them to be very small, kind of greasy and a bit mushy.  They just never tasted quite right.  They barely resembled kale.  They were more like the soggy embers of kale!

I really like using parchment paper when I make oven fries.  They don’t stick to the cookie sheet and you don’t need any oil.  So, they are fat-free! Seriously, what’s not to like?  I reasoned if I was happy with the results,  I was getting with sliced potatoes, yams, carrots, etc., using this method, then was worth a try with Kale too.

It worked!   Essentially, you are in between baking and dehydrating the kale in your oven.  The best part is these chips are so easy to make:

Baked Kale Chips

Large Bunch of Kale

Cookie Sheets

Parchment Paper

Sea Salt (optional)

Sriracha Sauce (optional)

Preheat oven to 270 Degrees

Wash and dry kale.  (I like to spin the water out with a salad spinner.)   De-stem Kale.  You want to remove the stem all the way up the leaf (no tough veins!)  Tear into large pieces (remember they will shrink as they bake.)  Place on parchment-lined cookie sheets.  Do not overlap.

Place the leaves close together but not overlapping!

Place the leaves close together but not overlapping!

Place in oven on different racks, allowing the heat to circulate.  Bake for eight minutes.  Check on kale.  Sprinkle salt on if desired.  Turn the pans the other way (vertical to horizontal or vice-verse.)  Bake for another 8-10 minutes.  The kale should be thoroughly crisp but not at all burnt when it is done.

Remove from oven and allow to cool for a few minutes before handling.  Then place kale in serving dish.  I shake any leftover salt into the bowl with the chips.  At this point, I like to put a drop of Sriracha sauce on each chip as I eat them.  Yum!  Sometimes, I’ll sprinkle them with my homemade cashew “Parmesan cheese.”

Hope you enjoy!

Many blessings,


Cynthia

Please follow me on Twitter.  Also, please LIKE my Facebook Page.

justdragonfly