Tag Archives: DIY

Time to Get this Garden Started!

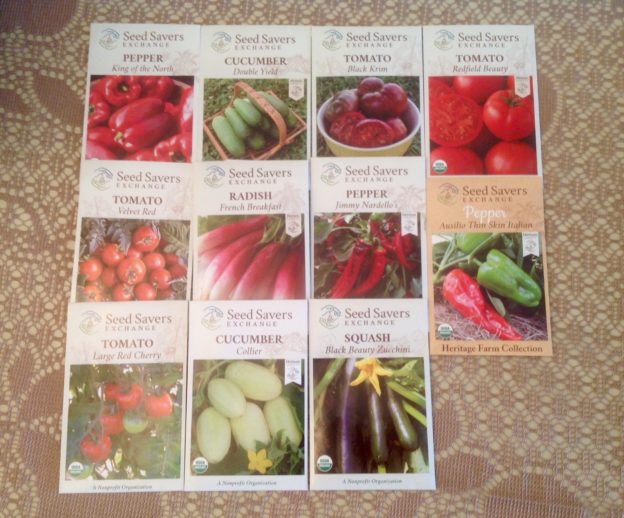
It’s that time again!  One of my favorite things about gardening is watching seeds turn into plants. I am really excited about this year’s seeds because I purchased them from Seed Savers Exchange.

Seed Savers was founded by Diane Ott Whealy and Ken Whealy in 1975.  The mission of this nonprofit organization is to save and share seeds in order to preserve biodiversity for generations to come. They maintain a collection of more than 20,000 heirloom and open-pollinated vegetable, herb, and plant varieties, including over 1,000 varieties of heritage apple trees.  Their collection includes many organic seeds.

I am happy to support an organization with such a great purpose.  I have to admit though, I am even more excited about seeing what comes out of these seeds!  My tomato plants this year have names like Velvet Red and Black Krim! The peppers are Jimmy Nardello’s and King of The North. How cool is that?

Check out this description for Redfield Beauty Tomatoes: “Historic Variety introduced circa 1889 by H.G. Hastings & Co. of Interlachen, Florida. Flattened pink 3″ inch fruits with excellent full flavor.” When was the last time you ate a tomato from the Supermarket that matched that description? Never.

I think that one of the most marvelous things about gardening is the opportunity to discover something new (and delicious!) right in your own yard. There is a romance to gardening. You nurture these plants along on the promise of the rewards to come when they bear fruit.  The prize you end up with is largely determined by the seeds you have when you begin… like all great romances!

Are you starting your garden from seeds? Have you used Seed Savers Exchange? Please leave me a comment. I would love to hear from you.


Meet Miles The Compost Pile!

I have been feeling a little guilty ever since I put up this post, Naturally Resourceful: Getting Scrappy with Vegetables! I mentioned in that post that I was too time-crunched to have a compost heap even though it would be great for my plants and the environment.

Nothing has changed schedule-wise for me since then.  However, my passion for gardening is now completely unhinged.  (It gets me through the day, people!)   I found I was spending an enormous amount of money on compost which is so riduculous considering I was, guiltily, throwing away things all the time that can be composted.  So, I decided to save money, myself from guilt and, hopefully a little of the environment by starting a compost bin.

I decided to use this garbage pail because it has a lid and I want to keep creatures out of my bin.  I burned holes in the sides:

And the lid:

With a hot glue gun.  I do not endorse this method because melting plastic never seems like a great idea.  However, my cordless drill wasn’t charged (as usual) and I really wanted to get it done.  I waited until I could no longer smell melted plastic and then gave the can a good swabbing before I started to add compost ingredients.

There are so many good resources for what to put in compost and even more importantly, what not to, like Jeff Yeager’s Rotten Luv, I am not going to go into too much detail.  Basically, you want a 2:1 ratio of brown matter to green matter.  I used newspaper shreds for brown matter.  (I figured The NY Times was appropriate for a compost heap named Miles) and for the green matter, I put in coffee grounds, eggshells (No, I didn’t eat the eggs!), plant stems, veggie and fruit peels.

Yum!

I layered the ingredients and gave it a stir.  And that’s it.  I’ll keep adding the ingredients in that 2:1 ratio, and keep stirring it up.  Mostly,  I can just let nature turn it into Black Gold for me.  There are more significant holes in the bottom of the can.  I placed it directly on dirt in the hopes that some worms will find their way in and take up residence, further enriching Miles with their castings.

Why did I name my compost heap?  Jeff Yeager named his Gomer.  I thought it was funny.  So, I decided mine needed to be named too.  So, Miles the Pile was born yesterday May 27, 2017.  I am looking forward to seeing him and my garden grow!

Many blessings,

Cynthia

Easiest DIY to to Upcycle Corks Ever!

The easiest way to reuse a cork is to stick it back in the bottle.  So, technically this would be the second easiest.  You might be able to do it right now.

I was organizing my essential oils when I spotted an accumulated collection of wine corks.  Am I the only who has trouble throwing them away?  If you do too, you might want to try this.  It occurred to me that if I put some cedar wood oil in the cork; I could throw it in my closet and it would work like those little cedar balls that you can buy at the drugstore.  So, I did and it does.

Just put a few drops right in the hole where the corkscrew went.  You can put it anywhere you want really since the cork is porous.  However, it’s a lot less messy if you put it inside.  It occurred to me that I could use whatever scent I wanted.  So, I started adding a few drops of lavender oil as well.  My closet now smells lovely!

There you have it: easiest cork DIY ever.  You’re welcome!  Tell your friends!

Many blessings,

Cynthia

Please follow me on Twitter.  Also, please LIKE my Facebook Page.

justdragonfly

Naturally Crafty: DIY Father’s Day Card

Did you know that greeting cards were handmade up until the middle of the nineteenth century?  That was when advances in printing made it possible to reproduce a design relatively cheaply.

I can’t help but think sometimes that technology and the ability to mass-produce cheaply has turned many of us into mass consumers rather than creators.  Well, I say “NO” this year to a cheap, mass-produced Father’s Day card and “hello” to creating my own handmade greeting.  I also decided to make it mostly from materials destined for the bin.

When we get book inserts at work, they come wrapped in shrink wrap on these cardboard pieces to keep them from getting damaged in shipping.  Since my office building doesn’t recycle, I have been trying to find ways to reuse them.  Usually, I stick them in large envelopes to keep documents from getting bent in the mail but I have found they are also great for craft projects like making cards and journals.

Father's Day Card Materials smaller

All of the materials used in this card, except for the gold ribbon, the lettering, the white inner paper, the gold washi tape and the Velcro dot on the inner envelope, were saved from getting dumped in the bin at work.  (If you need orange envelopes…call me.)

Father's Day Card Front

The white heart was punched from a name tent from a past class.  The circle behind it is punched from a Thank you card someone was kind enough to give me.

Father's Day Card Inside

While it may not be perfect in the way that a commercial card is, making your own gives you an excellent opportunity to add fun embellishments or personalize your greeting to the recipient.

Lucy Envelope

I added this envelope in the back, so I could include a letter from my parents’ dog, Lucy.  (They receive correspondence from Lucy whenever they go on long trips.  Perhaps, not surprisingly, this began when I found myself with an over-abundance of orange paper and envelopes.)

Tell me, do you ever make your own cards?  Is it something you would consider?

Wishing all you fathers (of humans and furry kids) a very happy Father’s Day!

Many Blessings,

Cynthia

Please follow me on Twitter.  Also, please LIKE my Facebook Page.

justdragonfly

Save

Save

Save

Save

Save

Save

Save

Save

Save

Repair or Replace: Are You a Lamp-Saver?

What do you do when something breaks in your home? Fix it, forget it or replace it?

Recently, I was in my parents’ garage when I spied their bedside table lamp languishing in a corner. I remembered about a year or so ago that it stopped working. My father said he would fix it. Somehow, it migrated from the bedroom to the basement and eventually ended up in the garage a.k.a. “The land of forgotten best intentions.”

I picked up the glass shaded touch lamp and wondered how it would fair out in the outdoor storage area for long. Other than a coat of dust and a slightly bent finial, it seemed fine. It seemed too nice to eke out the rest of its existence, forgotten in the garage. I remembered Mom saying she liked it better than the replacement they picked up. I had no idea what was wrong with it or how to fix it but I seem to have a knack for figuring things out (My superhero name would probably be The Researcher. Sexy, no?)

A few quick google searches revealed that the little lamp was probably ailing from a dimmer switch that went bad. Apparently power surges are the main nemesis of touch lamps. The part was about $8 at Home Depot. (I wonder how much the new lamp was.) I picked it up and attempted to install it myself but was thwarted by the plastic caps on the end of the wires. Little suckers wouldn’t come off! So, I turned the project over to Dad and within an hour he restored it to working order.

The whole thing got me thinking about how people seem to have stopped repairing things like that. It’s just so easy to go out and pick up a new one, relatively cheaply. I wonder how many of us really even think twice about fixing anything that originally cost under a $100. We then start accumulating all of these broken items in garages, sheds and basements because we feel guilty, knowing they can be fixed and should be, but it just doesn’t happen. Eventually, we run out of room and these items either get moved to a storage facility or thrown out. If they get thrown out, they sit in landfills, taking many, many years to decompose or are incinerated, releasing toxins into the environment.

We don’t like to think about our waste or what it is doing to the planet. I get it. I am busy too. Sometimes, it seems like if I have to stop and consider the implications of everything I throw away, my head might explode. I forgot to bring a fork to work with my lunch the other day and ended up using a plastic one. It happens. I wasn’t about to eat chili mac with my hands. However… maybe when something like a lamp or something similar breaks, knowing it’s not a big, expensive repair, it’s worth considering the time and effort to save it. When you do, you are saving money, space, the environment and possibly giving a repairman much needed work if the job is outside your abilities. That’s a pretty great return on investment!

Are you a Lamp-Saver? I would love to hear about your home repair triumphs. Please share them in the comments section.

Many Blessings,

Cynthia

Please follow me on Twitter.  Also, please LIKE my Facebook Page.

justdragonfly


Naturally Creative: The Perfect Gift

I love it when I get to make gifts for people.  I really try not to be annoying about it.  I mean I don’t make things to get out of buying things.  It is nice to save money when you are on a budget but I genuinely enjoy being creative.  So, when the stars line up affording me the time, opportunity and inspiration to make something I believe someone else will appreciate, truly, I am at my happiest.

Up until recently, I never had the chance to make anything for my dad.  Dad is a manly sort of guy!  I make jewelry, bath and body products, etc. While he enjoys my baked goods, I have never have been able to make him anything that lasts.  So, imagine my delight when I happened across this dragon egg tutorial from Accio Lacqueur!  So happy!

Just to give you a little background.  Dad is a very well-read cat, everything from classics to military history, sci-fi, thrillers, you name it BUT fantasy is one of his faves.  So, Dad is a big Game of Thrones fan.  In fact, Dad, my brother, sister and I, all started out reading the George RR Martin Series but I bowed out after two or three books.  (I need more dragons and magic, less gore; more romance, less creepy sex.  I digress…)  Dad has been an avid fan of the show since the beginning. When he took me to the Renaissance Festival last September, it seemed like every time we turned a corner, he was greeted with “Game of thrones!” or “Winter is Coming!” because he was sporting the coolest Family Stark tee shirt in all the realm.

We both like dragons.  Here are two of Dad’s snaps from that day:

Bigger DragonLittle Dragon


Pretty cool huh?

So, after after putting 5000+ tiny coats of varnish on 1000+ tacks over countless netflix sessions, this

image


Turned into:

Dragon Egg Two

So much fun!  I just had to share.

Do you ever make gifts for people?  Leave me a reply in the comments section.  I would love to hear all about them.

Many blessings,

Cynthia

Please follow me on Twitter.  Also, please LIKE my Facebook Page.

justdragonfly


Natural Beauty DIY: Better than Store-bought Facial Exfoliant

Most people know by now that commercial facial exfoliants with those little plastic micro beads are bad for the environment and have looked for alternatives.  Thank Goodness!

However, I don’t understand why people are willing to still buy products, containing other harmful ingredients, in packaging (that may or not be recyclable) and throw down a huge chunk of change to do it.  I just did a quick search and saw a dozen or so facial exfoliants, ranging in price from $5 to $50.  My facial exfoliant is all natural, only has two ingredients and costs practically nothing.  You can make it right now.

Honey-Sugar Facial Exfoliant

Pour approximately a tablespoon of honey onto a dish or in a small bowl.  Add a teaspoon of sugar. Mix them together.  Apply to damp skin in gentle circular motions with your fingertips.  Avoid your eye area.  (If any gets in your mouth, eat it!)  Rinse with warm water.  Voila! Beautiful smooth skin!

Sometimes, we seem to consume for no other reason than …just because.  Our inner child is lured by a shiny new package (destined to crowd landfills and pollute our oceans.)   We are looking for a quick fix to assuage our fears and insecurities.  So we buy something that we not only don’t need but may cause us harm either through artificial ingredients or by befouling Mama Earth.  Let’s top the madness; shall we?  Let’s take care of ourselves by being creative instead of blindly consuming.

How do exfoliate your skin?  Do you DIY your beauty products?  Leave me a reply.  I would love to hear from you.

Many blessings,

Cynthia

Please follow me on Twitter.  Also, please LIKE my Facebook Page.

justdragonfly

Naturally Homemade: Make Your Own Bread

There was no bread in the house this morning. I was going to run out and pick some up but then I remembered, I can make my own. I am off from work and had stuff to do at home; so, why not?

I started making my own bread last winter. I used to be intimidated by using yeast. I heard horror stories from people about how their breads and pastries never rose. Then I found this really easy recipe on holycowvegan.net and decided to give it a go:

Fast Whole-Wheat Bread

Author: Holy Cow! Vegan Recipes

Ingredients

  • 1 cup whole-wheat flour
  • 2 cups bread flour
  • 2¼ tsp (1 package) active dry yeast
  • 1 tbsp sugar
  • 1 tsp salt
  • 1 cup warm water (not hot– you will kill the yeast)
  • 2 tbsp extra virgin olive oil

Instructions

  1. Place 1 cup of the bread flour, the whole-wheat flour, yeast, sugar and salt in a large bowl or in the bowl of a stand mixer. Whisk to mix together.
  2. Add the water and the olive oil and mix. Add more of the bread flour if needed. How much flour you will need, will depend on where you live and what the weather’s like. I made this bread on a rainy day in Washington and I needed nearly the whole cup. If you live in a dryer region you might need less.
  3. Knead the dough for 10 minutes by hand or with your dough hook set to low speed.  You should now have a smooth, pliable ball of dough that’s not at all sticky.
  4. Place the dough ball in an oiled bowl, turning over once to coat the top with oil.
  5. Cover loosely with plastic wrap or a kitchen towel and set aside for 30-45 minutes or until the dough has doubled in size.
  6. Remove the risen dough from the bowl and punch it well to deflate all the gases. Using a rolling pin, roll out the dough into a triangle about 10 inches long. Now roll the dough toward yourself and make a cylinder, tucking down the seams and pinching them in so you have a smooth loaf.
  7. Place the dough in a standard loaf pan, seam side down (most loaf pans are 9 X 4½ or 10 X 5 inches)
  8. Cover loosely with oiled plastic wrap and let the bread rise in a warm place about 30-45 minutes or until the loaf has risen and domed over the top of the pan.
  9. Preheat the oven to 450 degrees Fahrenheit.
  10. Place the loaf in the oven and bake for 10 minutes. Then lower the heat to 350 degrees and bake another 30 minutes.
  11. Remove the loaf pan to a rack and let it stand until the bread is cool enough to handle. Remove the bread from the pan by loosening the sides with your fingers or a spatula. Place on a rack until it has cooled through.
  12. Slice. Eat.

I have been making it for quite a while and have since made some of my own alterations. Instead of adding more bread flour during the mixing stage, I add the whole wheat flour. So, usually I do 2 cups of whole wheat flour and one cup bread flour. I pre-heat the oven to 425 degrees but I turn it down to 350 right before I put the bread in. The crust is slightly softer that way and better for making sandwiches in my opinion.

Making your own bread is fabulous when you have the time. The benefits are numerous. You can control the ingredients. There are no preservatives. It’s always fresh and delicious. I really love the self-sufficiency of making my own bread.  I am being creative, rather than just consuming. I am not reliant on a store to provide for me.  By far though, my favorite part is the smell! Oh my goodness, your house will smell so so so wonderful. Your nose will be very happy!

Do you ever make your own bread? Are you willing to give it a try? Please leave me a reply in the comments section. I would love to hear from you.

Many blessings,

Cynthia

Please follow me on Twitter.  Also, please LIKE my Facebook Page.

justdragonfly

Naturally Crafty: Upcycled Cards and Gift Tags

Ever go to the card store and find yourself thinking,”Man, cards are really expensive!?” Ever go to the craft store and find yourself thinking, “Man, paper is really expensive!?” Yes? Excellent! I think you are going to like this upcycled solution.

tissue boxes

I started noticing some really nice designs on tissue boxes after watching a few of Jennibellie’s videos on YouTube.  Definitely, check her channel out for inspiration.  She creates truly beautiful projects and often incorporates pre-used materials into her designs.

I picked up a few punches from Michael’s and began making some creations of my own (which I would have photographed more of if I had known I was going to write this post. )  Punches are a good investment.  They save you time, as well as wear and tear on your scissors… and your hands!

tissue hearts

It’s a lot of fun making your own cards because they can be as simple or complex as you want or have time to make.  You can add hinges made from ribbon or brads.  You can also personalize them to suit your gift recipient by adding their name, embellishments and using their favorite colors.  You’re only limited by your imagination!

Use what you already have whenever you can!

Use what you already have whenever you can!

Once you start doing these types of upcycled projects, you develop an eagle for materials that can be made over like these old name tags from work.  Why not? The card stock is good quality.  They would only end up in the trash.  Why not flip them over and give them a second life?

punched out name

Before you know it, you’ve created a pretty little, thoughtful gift decoration and it cost you practically nothing!  You didn’t have to go to a store.  You got away from electronics for a little while.  You have exercised your creative muscles.  You have made choices that are kinder to Mama Earth.

Heart pearlmonogram pearl

Do you make your own cards and gift tags? Leave me a reply in the comments section and let me know.  I would love to hear from you.

Many blessings to all,

Cynthia

Please follow me on Twitter.  Also, please LIKE my Facebook Page.

justdragonfly